 |
|
Lights, Camera, Snacks!
The Idea For the photos in The Ferret Calendar, most of our time is spent working on new ideas before the photo session. Our photographs can be complex with elaborate backdrops, props and surfaces. Yours can be just as detailed, or as simple as a close-up photo of your ferret’s face. In either case, you must have an idea of what you want before your photo shoot. Be realistic. Ferrets are very inquisitive and busy creatures, so don’t expect something that’s not in their nature–that’s unfair. There are a lot of tricks to taking wonderful photographs of ferrets, and if you know your pet’s interests and behaviors, you will improve your chances of taking a great photo. Planning The most important thing you can do to make sure your photo session goes smoothly is to ask one or two friends to help. We always work with volunteers from shelters in Oregon, Washington, and Nevada where we take our pictures for The Ferret Calendar. It is essential to have someone near the set to prevent your ferret from wandering off (especially if the set is a table or anything raised off the floor). It’s also helpful to have an extra pair of hands to offer the ferret a snack, or to rattle a toy to get it to look in the right direction. Your helpers can also hold one or more ferrets behind strategically placed props for a very dramatic photograph.
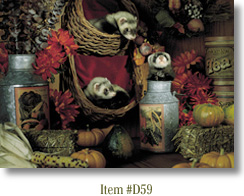
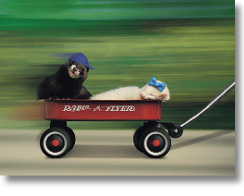
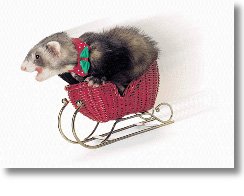
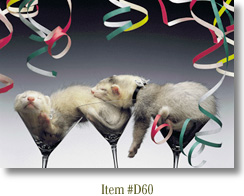
Now, gather or purchase any props you need. Many items in your home can double as props. Also, visit a few local craft stores, which are filled with great props, or browse around the store to get some ideas for future photo sessions. Place some flowers or wrapped boxes in the foreground to hide a pair of hands or the edge of your set. Flowers are also a terrific way to emphasize a time of year–for example, use the tulips for winter and early spring pictures, zinnias or roses for summer shots and poinsettias for Christmas photos.Your choice of colors will also convey a mood or message. A fall photograph can be illustrated with warm brown and orange tones. Traditional greens and reds are the colors of Christmas, and to enhance the holiday scene even more, use some ornaments or wrapped presents as additional props. Next, select an environment for your photo session where your ferret’s ability to move around is limited. Consider using a small table or chair, or something you can safely put your ferret in like a cookie jar, small hatbox of basket. Always keep your ferret’s safety in mind and place pillows or pads around the base of the table in case your pet decides to leave the set unexpectedly. We have successfully used small sleds, baskets and wagons as props. Place snacks around the edges of the set to keep your ferret in its confined space. Never put your ferret in anything that is too small for it to sit or stand in comfortably. If your ferret is uncomfortable or upset, it will have that much more reason to leave the set, or it may become too stressed to cooperate. Photographing your ferret should be fun for both of you, so make sure the surroundings are safe and comfortable.
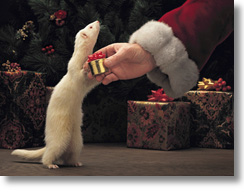
Your ferret will look its best when it has been bathed and brushed, and has clear ears and trimmed nails. Unless you are looking to photograph your ferret performing the weasel war dance, give your pet time to settle down after its bath. Its coat will photograph best when it is completely dry and fluffy. Make sure your props are clean and fresh-looking. If you use fabric as a background, iron out the wrinkles–the extra effort is worthwhile when you see your photos. Photographing animals at eye level, or even below eye level, can result in very intimate and compelling photos. However, there are also photo situations when shooting down on your ferret makes sense, such as photographing a sleeping ferret or one that’s peeking out from under a bed or blanket. In either case, get in fairly close so your ferret fills most of the frame to ensure that it is the main subject. Keep the backgrounds simple. Pick a plain wall or fabric to shoot against. Or, let the background go out of focus. In one of our new Christmas cards, we used a dark Christmas tree with presents wrapped in dark colors as a background. The ferret and Santa’s hand were approximately three feet in front of the background blurred. It’s obvious what’s most important in the scene, and the viewers’ eye will not wander all over the photograph. This same photo illustrates another important point about background use. If your ferret is light colored, a dark background can effectively make it stand out from the rest of the set. The converse is true for a dark ferret. Ferret faces are delightfully engaging and expressive, and a photo in which a ferret is looking right at you has a lot of appeal. Sometimes, however a photo is best illustrated with the ferret looking off at something or someone else. Try both ways and see which photo comes out better.
Understanding a few photography basics will improve the quality of your photos. The amount of light falling on the scene is critical for a well-exposed, sharp photograph. Low light levels result in under-exposed film and very dark and grainy prints. Less intense light also forces your camera to operate at slower shutter speeds (to allow more light in), which do not capture moving targets well, and your photographs will not be sharp. Indoor Photography: When you photograph indoors, set up near a window so your photo "studio" is bathed in sidelighting. We recommend using a flash when you photograph indoors because there generally isn’t enough light to expose your film accurately, even if you are using a relatively high speed film. Outdoor Photography: If you don’t have a flash, photograph outdoors, but remember that safety is the number one priority any time a ferret is taken outdoors. Make sure to have at least two helpers present, and keep your ferret confined to a table or chair in the backyard. Plan a photo where your ferret is either held by someone else or is leashed to something to avoid mishaps. A frightened ferret is quick, and any hole–whether it is through the fence or under the house–offers potential escape routes. If you plan to photograph at a park or another public place, remember that large and small dogs are real threats to ferrets. You must have your ferret under control at all times when you are outside. No photo is worth possible injury to your pet. Accessories: Use a tripod if possible because with a tripod, you can frame and prefocus on a particular area of your set. Another helpful tool is a long cable release. Look for a four- to six-foot cable, which costs about $15 at camera stores. With a cable release, you can step away from behind your camera to entice your ferret to look at you, or wave a snack in front of its face with one hand and release the shutter with the other. While most "point-and-shoot" cameras can be fitted onto a tripod, they generally do not allow for a cable release attachment. Film: We recommend 100 ASA film or faster for outdoor photography and 200 ASA film or faster for photographing indoors. Macro photos allow for wonderful close-ups, but they have a shallow depth of field (the distance between the closest point in focus and the farthest point in focus). For a Macro photo, use 200 ASA or faster films, and to increase depth of field, use your flash. Finally, don’t be stingy with your film. Planning and setting up a photo shoot takes a lot of time and energy, so expect to go through at least one roll of 36 or two rolls of 24 exposures to maximize your chances of getting the photo you want. For each month in The Ferret Calendar, we typically take six to eight rolls of 12-exposure film. That’s between 72 and 96 photos per shoot! Working with Your Pet Knowing what motivates your ferret and having a lot of patience are essential during a photo session. Some ferrets are very food-motivated, while others are not. Some are more attentive and curious when they hear an unusual sound, others scamper away in fear. You’ll probably have to try quite a few methods to get, and keep, your ferret’s attention.
Motivators Snacks are an obvious way to get the attention of a food-motivated ferret. Place a little Linatone, Ferretone or Nutrical where you want your ferret to sit or stand. Let it lick up the treat, but have the bottle or tube ready when it’s finished. Wave the bottle or tube to get your ferret to look at you and the camera. Ideally, as soon as your ferret looks up, you whisk the snack away and take the photograph. However, sometimes you do not move fast enough, and the tube or bottle appears in the photo. Do not let your ferret over-snack before or during the photo session because halfway through the shoot, it may literally have had enough of snacks and will become uncooperative. Sounds are also an effective way to get your ferret’s attention. Some ferrets are trained to respond to a squeaky toy, while others recognize the sound of their snack jar being shaken. Quite often, an unexpected or unusual noise will have a riveting effect on your ferret. We buy all kinds of novelty noise-makers to have on hand for photo shoots.
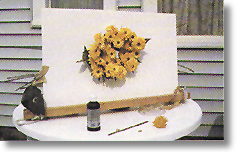
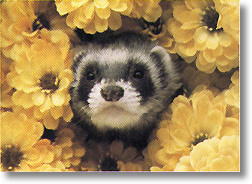
Our original idea for the photo in the calendar was celebrating the arrival of spring with a ferret’s face bursting through flowers. Jodie and I went to a nearby craft store and purchased a piece of 1/4-inch white foam core that measured 36x24 inches. The lightweight material is stiff, but it is easy to cut We decided to use bright yellow flowers to complement our model, Aramis, a dashing dark sable. We wanted to fill the camera’s frame with flowers, so we thought 10 to 12 long stemmed silk flowers would do the trick. For this photo, we were concerned only with the foreground, and as you will see, our set is not elaborate at all. I asked Jodie and her husband, Keith, to be my volunteers. Because the ferret is securely held in the photo, we decided to take it outdoors in the Brown’s enclosed backyard. Jodie and Keith’s outdoor table became our set, and we used a couple of 2x2s, a large rock, tape and twine to create a slot where we inserted and anchored the foam core. Then we cut a hole in the center of the foam core that was large enough to accommodate Aramis’ head comfortably with about an extra half inch all the way around. Smaller holes were made one at a time around the large hole so we could insert the flowers. We positioned the flowers one at a time to make sure each flower hid the edges of the large center hole. We also did not want the flowers to look crowded. Positioning the flowers involved a little trial and error, but because the flowers had wire stems, we could bend them any way we wanted. When the flowers were in place we bent the stems flat against the foam core and taped them to prevent the flowers from moving. This also kept Aramis from any potential injury from, the sharp wire ends. We positioned the set so sunlight hit it from above and from the side. When the sun is directly behind the photographer, the resulting photographs appear flat; and when the sun is behind the set, it can cause flare in the lens and ruin the photo. It was about 4 p.m., and the weather was sunny with a few clouds. I loaded the camera, with 200 ASA film, and because I wanted a close-up of Aramis’ face, I set the point-and-shoot camera on Macro and turned on the flash for better depth of field. While Keith held Aramis behind the set, Jodie enticed him through the hole with Linatone. Because the camera was not on a tripod, I sat in a chair that put me approximately at eye-level with Aramis. I prefocused on the flowers, and framed the scene with the large hole in the middle. When Aramis stuck his head through the hole, I snapped the picture. I’m very pleased with the results, and the Browns are happy with this beautiful portrait of Aramis.
|
|||||||||||||||